Stretchy Pre-Flat Cloth Diaper Tutorial & FREE PATTERN
Have you been thinking about sewing your own stretchy pre-flat diapers?! If so, this tutorial is for you! Making your own diapers is quite a simple process, though there are some materials and skills needed to get the quality and absorbency for a successful diaper. A sewing machine and sewing experience is recommended for this tutorial. Experienced sewers can expect this project to take 30 minutes per diaper, while less experienced sewers might take 1 hour.
I first started using pre-flat diapers for nighttime. We were having leaking issues, as our daughter is a heavy front wetter and tummy sleeper. No matter how thick we stuffed our pocket diapers, she always leaked. So with the 360º protection of the stretchy pre-flat, it's solved our overnight leaking issues! We use these underneath a pocket diaper with a thirsties hemp insert for extra absorbency and wetness protection. This is working very well for our 11 mo daughter. Plus they're incredibly soft! The stretch allows them to move with baby when they're on the go, and it's easy to adjust the diaper to get a snug fit no matter what size your baby is.
What is a Stretchy Pre-Flat Diaper?
Stretchy pre-flat diapers are composed of stretchy absorbent materials (often bamboo, hemp, and cotton) that when folded and wrapped on baby correctly, provide 360º absorption. They are not waterproof in any way, so you'll need to use them with a waterproof cover, or a water resistant cover like wool or fleece shorts. Many families choose to not use a waterproof cover when at home and simply change baby often enough to avoid any leaking issues. You'll also need a way to fasten the diaper. I use a
Snappi or Boingo which are small stretchy devices with claws that grip the fabric and keep everything in place. A basic cloth diapering pin will also do.
The shape of a pre-flat is a combination of a Flat diaper, which is a large (usually 36x36") single layer square of fabric, often cotton, that is folded in a variety of ways to create absorbent layers on baby. And a pre-fold diaper which is a smaller rectangle of cotton fabric that is designed to already have extra absorbency in the center third of the diaper.
These diapers are shaped so that the bottom portion is tri-folded to the center to create multiple layers of absorption, while the wings up top wrap around the baby's hips and hold everything in place. You can add extra "boosters" in the bottom tri-fold if you need more absorbency.
Fabric Materials
Stretchy Pre-flat diapers are made of 2-3 layers of fabric that when tri-folded make 6-9 layers of absorbency. I purchase my fabric from
Natures Fabrics. They have amazing service and quality for the price!
I like to use combination of bamboo, cotton, and hemp fabrics which are all incredibly absorbent. Hemp is the most absorbent but does not absorb as quickly as the bamboo and cotton. French terry is the style of weave, which has a tight, soft weave on one side that feels like a t-shirt jersey, and the backside is many tiny loops of material that hold extra moisture. Bath towels are made from terry fabric for this reason.
 |
| You can see the texture of the terry (looped) side of this fabric here |
GSM is the weight of the fabric which directly correlates with the amount of absorbency. The higher the GSM, the more moisture it can hold. But... too heavy and it will be very bulky and more than you might need for a diaper. I would not use higher than 400 GSM for these and no less than 300 GSM for your absorbent layers.
Here's my recommended fabrics. I purchased 1 yard of each. See cost estimates below for how many diapers per yard.
*This fabric can be a lower GSM- as it's more decorative than anything. This is just for fun to make the diapers exciting. You can purchase the french terry fabrics in solid colors if you want and not to an outer pattern layer. I purchased my patterned fabric from Joann fabrics in their POP! Kids collection since I had a coupon.
Cost per diaper
If you purchase 1 yard of each of the 3 fabrics listed above (not including the fleece for boosters), cost breakdowns are as follows.
Newborn: You can get 12 diapers with this amount of fabric for a cost of $4/diaper.
One Size: You can get 6 diapers with this amount of fabric for a cost of $7/ diaper.
Toddler Size: You can get 4 diapers with this amount of fabric for a cost of $11/diaper.
*These cost estimates do not include fabric for extra boosters. The Newborn and One Size will use up this fabric with very little remnants. The toddler size will leave enough fabric for boosters.
*I also purchased my patterned cotton spandex with a coupon so I got it for $8/yard. If you choose to purchase a more expensive pattern, your cost per diaper will increase.
Diaper Wash & Care
Before sewing with your fabric, I always recommend washing first! This will make sure the fabric has shrunk if any before you cut your pattern. Once diapers are finished, you can treat them like any other insert. I wash mine on hot with my regular diaper load, and dry in the dryer on medium heat.
Diaper Pattern
The pattern is FREE! Email me for the PDF: colorfunquilts@gmail.com
The pattern comes with 3 sizes. Weight estimates for each size are approximate. Some kids might size up or down at different weights depending on their body type. Each pattern also comes with a pattern for a booster insert.
Newborn fits approximate weight 7-15 lbs. One Size fits approximate weight 15-30 lbs. Toddler fits approximate weight 30-50 lbs.
*This is my own self-drafted pattern based off of my daughter's measurements. It has not been tested on other children. If preferred, you can find more thoroughly tested diaper patterns by other designers online. This pattern worked well for me, so I figured I'd share in case it works well for you too!
Printing the pattern
Make sure your printer scale is set to %100 or click "do not scale". Do not click "fit to page" or it will change the sizing. There is a 1" square on each pattern to check your sizing after printing. If your 1" square does not measure exact, try printing again with adjusted settings.
Cut and tape the edges together so the small grey triangles and letters match up for each size. The newborn pattern is on two pages, the One size is also on two pages, and the toddler is on 4 pages. Booster patterns are on their own two pages.
Sewing the diaper
I recommend a serger sewing machine for these. The serger creates a really nice edge, is super fast, and is great for maintaining stretch in the diaper. You can use a regular sewing machine with an overlocked or zig zag stitch and jersey needle. Either a polyester or cotton thread at 30wt (or similar weight) will work. It will not look as professional but should work the same. Jersey knit fabrics such as these do not fray, so this stitching is really only there to keep the fabric layers together and provide a nice clean edge.

|
| This is the serger machine I have if you're in the market. It's a JUKI MO-644D |
Step 1: Cut and stack
Using your pattern, fold your fabric in half, making sure that you fold your fabric with the most stretch reaching left to right with the wings of the diaper. This will give you the most flexibility to stretch the diaper for a snug fit around baby's hips. Your bamboo and hemp bamboo fabrics have 4 way stretch, but your patterned outer lay may not, depending on what you purchase for this.
Align your pattern on the fold and cut out one of each fabric, heavy bamboo, bamboo hemp, and patterned jersey.
Stack them in the following order.
Jersey Print side down (optional)
Bamboo Hemp terry (looped) side up
Heavy Bamboo terry (looped) side down
This will create a diaper that has the soft jersey material on the inner and outer layers with the print facing out and your solid absorbent layers in the middle.


Step 2: Pin and SewPin around all sides and serge your edges together. Clip your thread and tie in a knot or pull the extra threads back through your stitching to secure. If you're working on a regular sewing machine, you can backstitch before clipping threads.
Pin around all sides and serge your edges together. Clip your thread and tie in a knot or pull the extra threads back through your stitching to secure. If you're working on a regular sewing machine, you can backstitch before clipping threads.
Step 3: Boosters
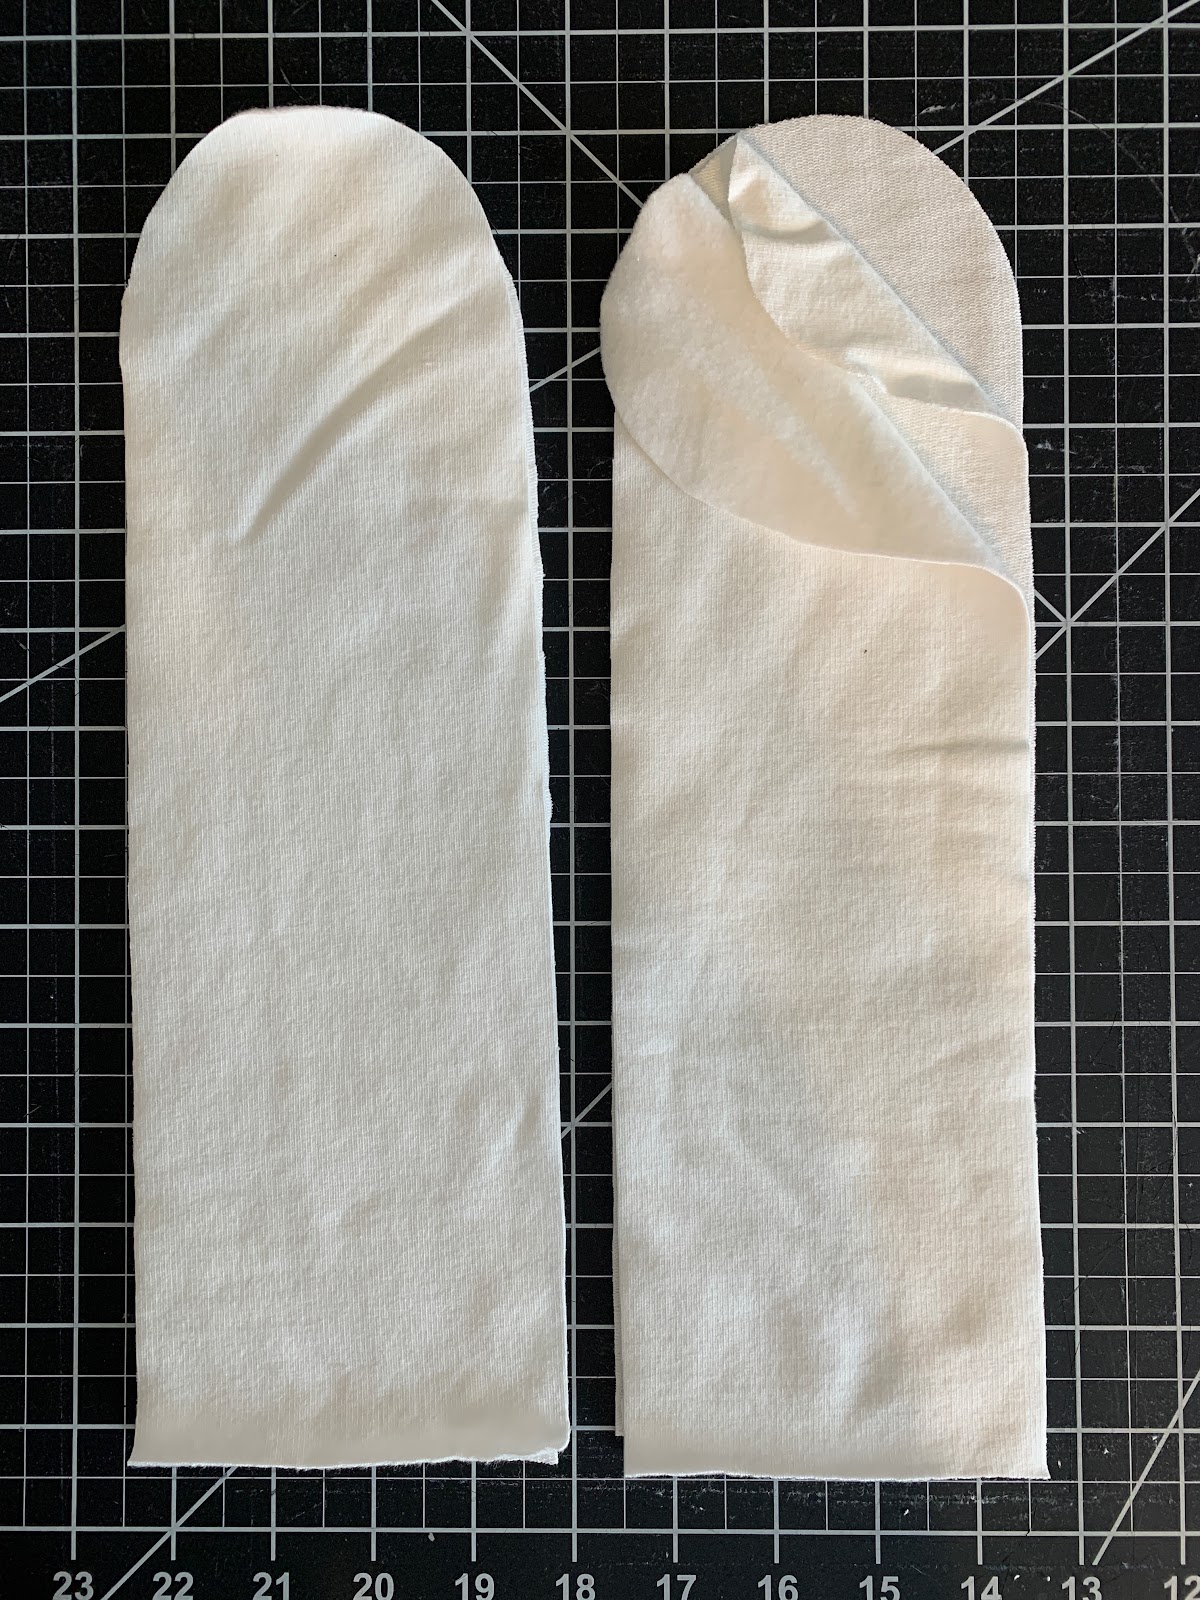
If you want to add a booster, you can either sew them separate from the diaper, or sew them into the diaper so it's all one piece. Just as you did for the diaper, cut your fabric for the booster using the pattern. My boosters are one layer each of the bamboo french terry, bamboo hemp french terry, and bamboo fleece. OR 3 layers of bamboo fleece.
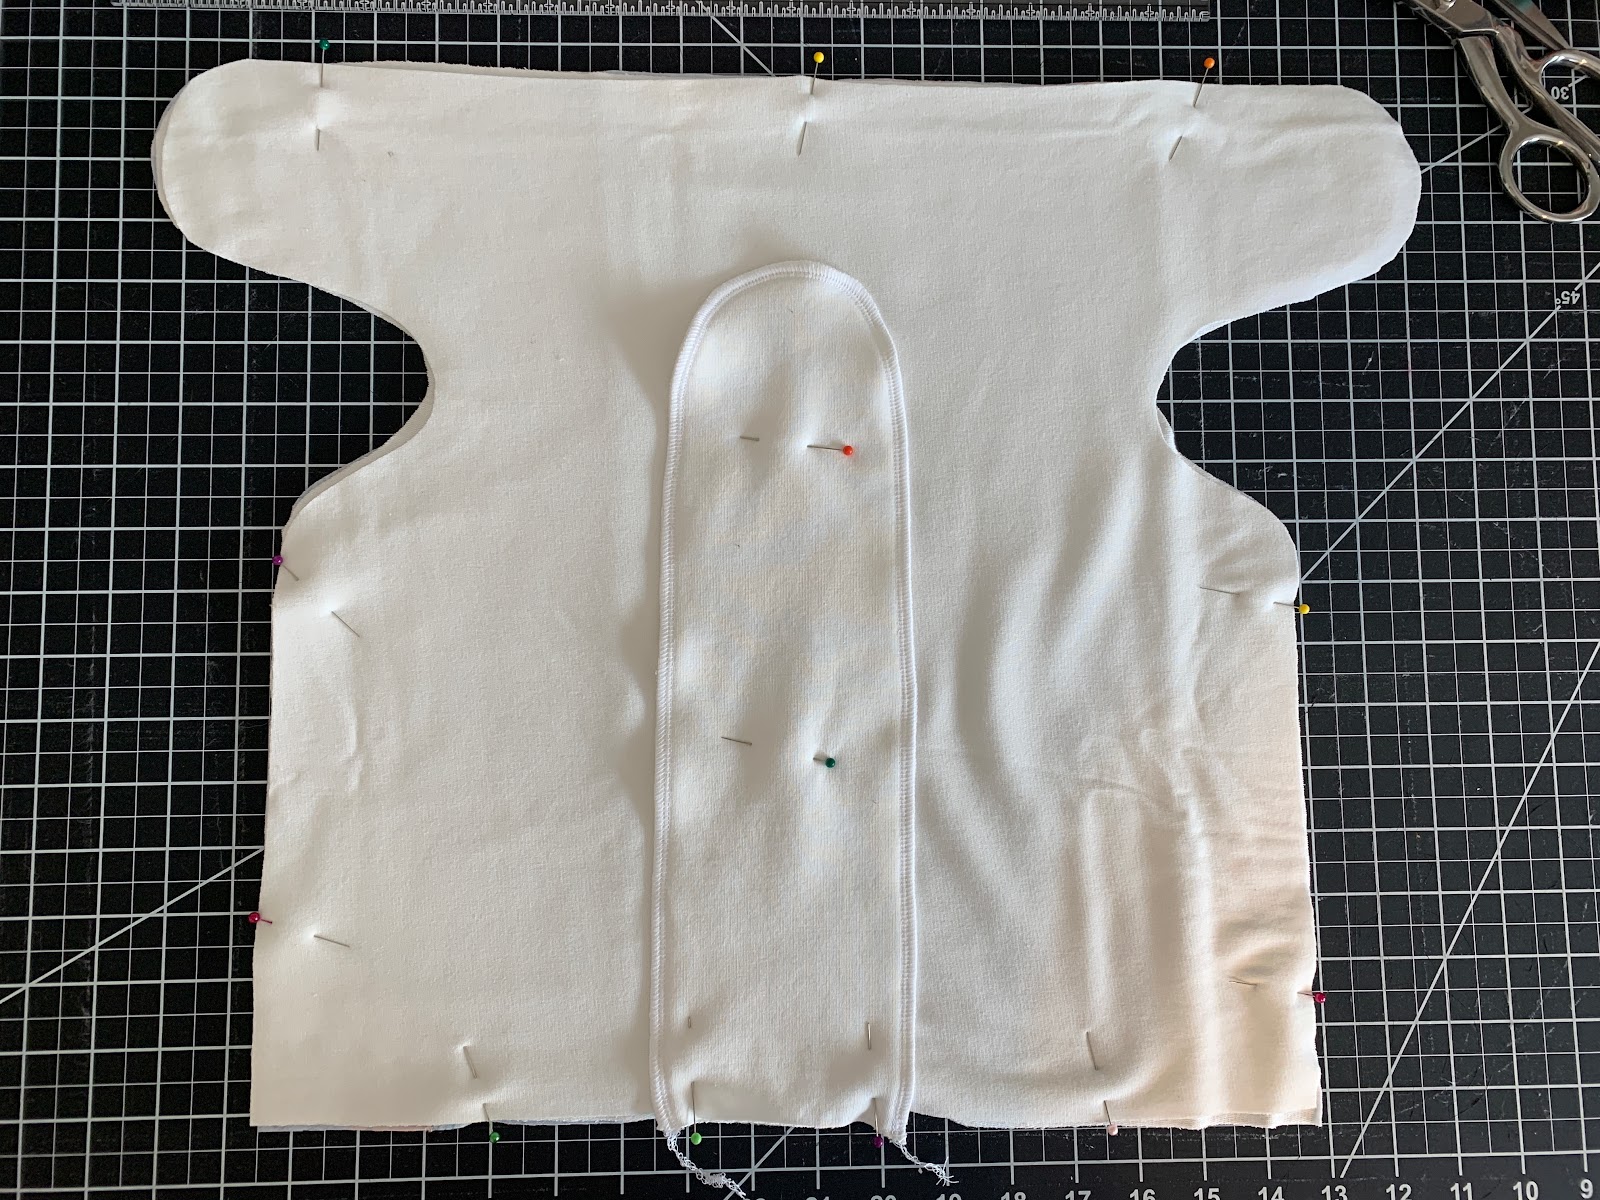
If you keep them separate, simply cut and stack your fabrics and serge around all sides. If you choose to sew the booster into the diaper, sew around the full curve, leaving the bottom edge without stitching. Center and pin the booster onto the 3 layer diaper. I like to add a couple extra pins to prevent it from flopping when you serge around the diaper.
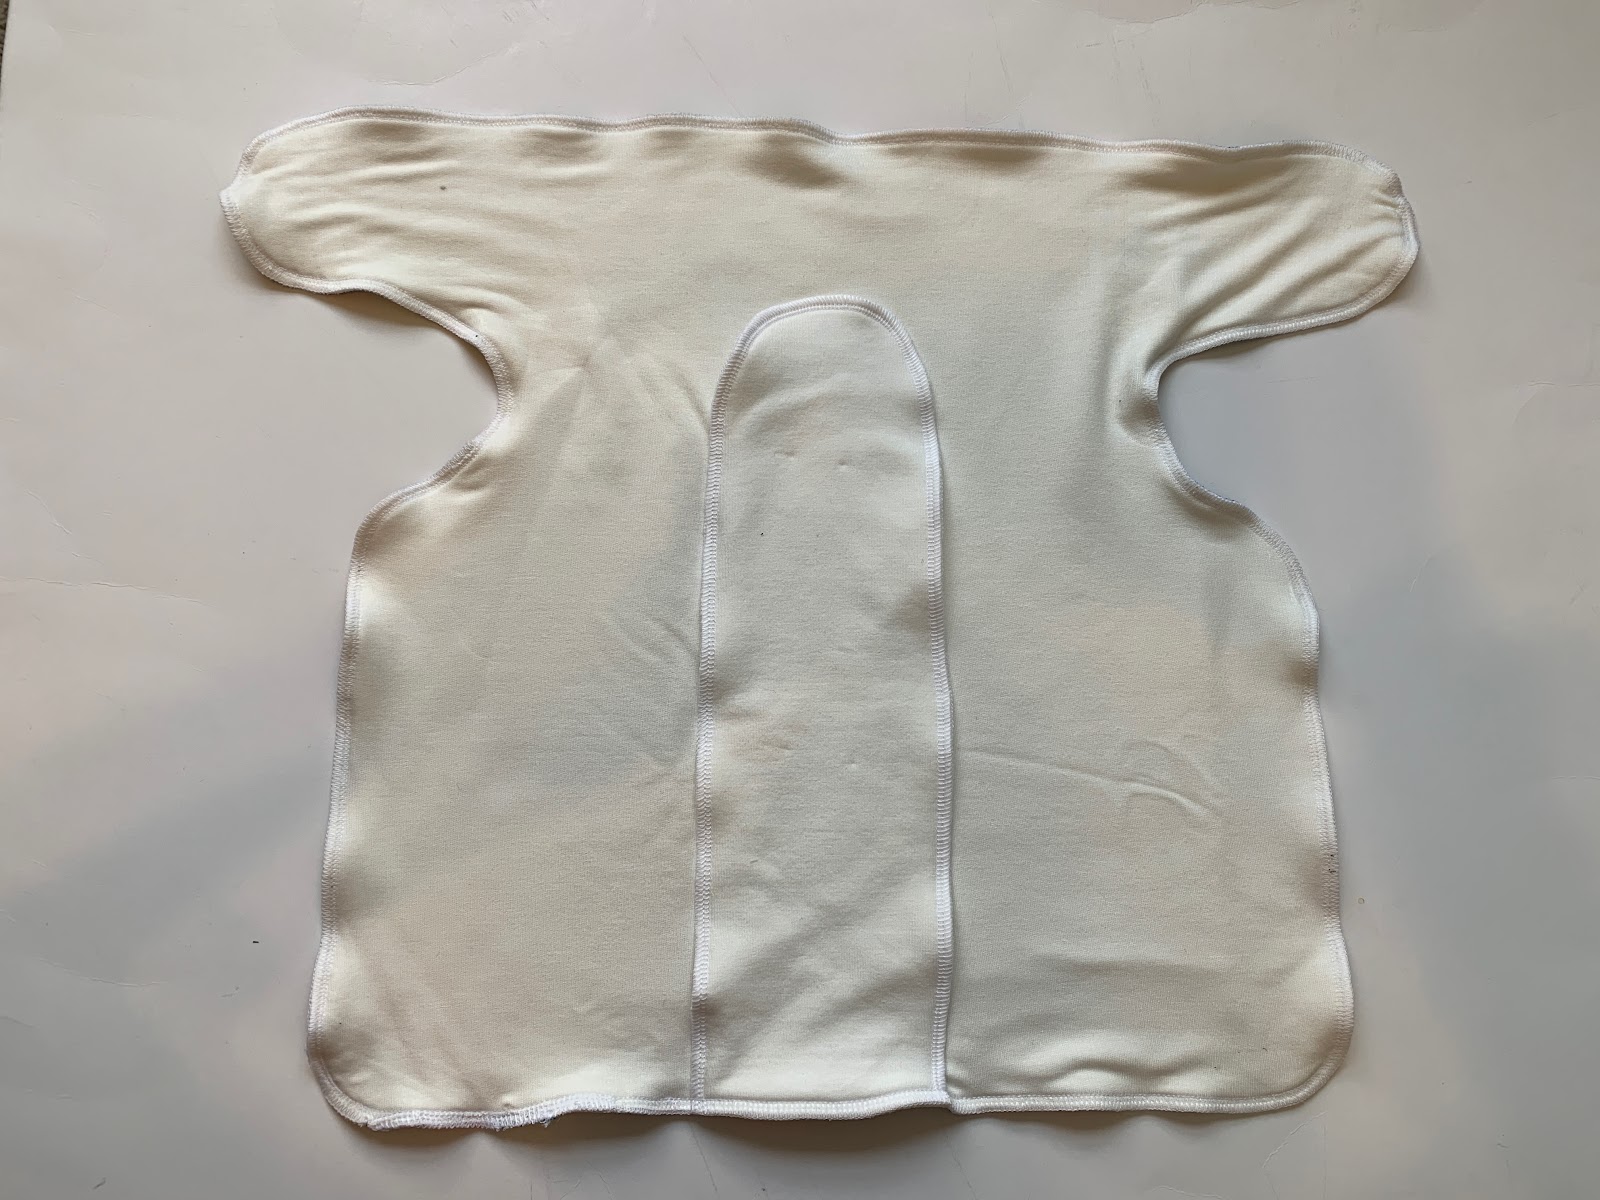
Here you can see the diaper with separate and attached booster. It's all about your preference!
Finish and Fit!
And that's it! It's super easy to sew. Washing these diapers a few times will increase the absorbency and get them to their maximum capacity.
To fit on baby, simply trifold the diaper with or without the booster. Fold the padded folds up between baby's legs, making sure to tuck in the underwear line for a tight fit. If needed, fold down the rise to adjust for smaller baby. Bring the wings around and secure with a snappi or other closure.
diaper is one size on a 9 month old baby
diaper is newborn size on a 3 week old infant
I hope you enjoyed this tutorial and have fun making your own super soft pre-flat diapers for your little one.


Comments
Post a Comment