
Walking Foot Quilting: Orange Peel Design
I have always quilted my own quilts on my domestic machine. I've certainly had my ups and my downs through this process, and over the years have become more confident with my machine quilting. So recently I've tried to be a bit more clever with my quilting designs and break out of my norm! I feel quite comfortable doing straight line quilting with my walking foot, but when it comes to free motion quilting (fmq) it's just not my forte. That being said, I love the look of curves and other not so straight lines. So, the solution became finding a way to quilt curves efficiently with my walking foot.
I've had this Large Lattice Quilt top done for a few months now and have been trying to come up with a solution to quilting it that wasn't my go-to straight lines. Then I remembered this variation and it was a perfect fit! This tutorial will take you through the process to draw and quilt this orange peel design on your domestic machine.


Enter the orange peel design! This pattern is super simple to accomplish on your domestic machine. When complete, you see circles, star shapes, and leaf shapes- pretty cool, right?? It's been around for a long time, and there's some great quilt patterns that use this motif which I think are super fun. I've seen beautiful long-arm quilters use the orange peel design on a pantograph, so figured why not try it at home?!
So, my first step to thinking about a quilt design, is to draw. I use a printout of the coloring page from my quilt pattern, then use a pencil to sketch some design options. My go-to for this quilt pattern would usually be a large crosshatch quilting design. This orange peel quilting is not too different from sewing a straight crosshatch, I just have to substitute curves for straight lines.
Marking your quilt top

So now that I have a plan for my quilting, I need to mark my basted quilt. I use a hera marker for this process, though you could use a disappearing ink pen, chalk pen, or I've even seen people substitute a dull butter knife for the hera marker! If you've never seen or heard of a hera marker before, it's basically this plastic tool with a narrow but dull edge that's used to crease the basted quilt. It leaves a surface level indentation on the quilt that is visible from the top side only (meaning you can't see your markings on the backside of the quilt). The markings hold for a long time too! I've marked and left a quilt for a couple of months and could still see my creases- much more successful than a disappearing ink pen. Clover makes them and they come in a few different sizes. You can find the hera marker at most quilt shops and online stores!
My process for marking is simple, I freehand it. Now you could totally create a template and mark your quilt that way, but I'm not a perfectionist and strongly believe in the handmade process (imperfections and all). If you're pin basting, I'd recommend laying out your quilt sandwich, then marking your quilt top with the desired pattern before adding your pins. If you're a spray baster, you can do all your basting first, then mark your quilt.
Tips:
- Mark on a hard surface! The hard floor or a tabletop works well. The hera marker won't damage either and also won't work as well on a softer surface.
- Use a decent amount of pressure for a longer lasting line. You won't hurt the quilt top and it'll be easier to see when you get to the quilting part.
- Pin basting: Make your quilt sandwich, mark, then baste
- Spray basting: Baste your full quilt sandwich, then mark
This pattern works quilts that can be divided into squares. Whether you're working with larger squares or tiny ones, this can be adjusted to any size. My pattern breaks down into 6" squares. I mark my lines working at a diagonal, alternating rows and drawing curves corner to corner. I sew each row the same way!


I mark and sew my design in quadrants, sewing from the corners and working from the center out. Starting with the orange lines, I mark from the top left corner of the quilt. Notice how my line is one continuous wavy line. My quilt pattern breaks down into 6" squares, so I follow each square, marking with the hera marker from corner to corner. I'll start from the top left corner and draw my lines, moving towards the right until I get to the top right corner of the quilt. Then I'll come in and mark the purple lines, to complete each row of orange peels.


Once my first quadrant is marked, I'll rotate my quilt 90 degrees and mark my next quadrant, working from the top right corner, now moving down towards the bottom right corner.
Once my second quadrant is marked, I'll rotate again and mark my third quadrant. Moving this time from the bottom right corner out towards the bottom left corner. And finally the fourth quadrant is marked moving from the middle out towards the top left corner. At the last stage, you have very few rows to mark and sew!
Once my second quadrant is marked, I'll rotate again and mark my third quadrant. Moving this time from the bottom right corner out towards the bottom left corner. And finally the fourth quadrant is marked moving from the middle out towards the top left corner. At the last stage, you have very few rows to mark and sew!
Quilting your design
Now that you've marked your quilt top, it's time to get sewing! I follow the same guidelines for sewing as I used for marking the quilt above. I'll take it one row at a time, sewing the orange line first, then purple, working always from the middle-out until all 4 quadrants are done. You'll need to rotate your quilt top by 90 degrees each time, starting on a new side of the quilt for each quadrant. For each row, I'll work block to block, making sure my needle crosses over each block right at that intersection. This will create nice pointy ends to your orange peel design.
Working on the diagonal in each quadrant is a really helpful way to avoid drag when you're quilting. You will only ever be shoving half of your quilt top under the throat of your machine, and you won't have the whole weight of the quilt to shuffle each time you need to adjust your hands.
Tips for quilting:
1. Use quilting gloves. They make a huge difference!! You can get gloves from most quilting stores, but I just use grippy gardening gloves from any hardware store. These ones are in my opinion, better than the fancy quilt specific gloves that I've purchased in the past and way cheaper.
2. Go slow. I know this seems obvious, but you'll have way more control as you sew if you take your time. And your stitches will be prettier too.
3. Use a walking foot. This is a biggie! The even feed on your walking foot will make all the difference and help to give you that control.
4. adjust your hands often. Avoid drag my adjusting your hands and fluffing/shifting your quilt often. About every 2 curves, I'll adjust and keep sewing to avoid pulling as you quilt.
5. Use the needle down position if you have it. If you don't, remember to put your needle down before adjusting your hands/quilt.
My quilting preferences:
- I sew on a Juki 2010TLQ. It's a great machine that does straight stitch only and has a needle down position. However, I learned to sew and quilted many quilts on my very basic Singer Tradition sewing machine. So, no matter what machine you have, this design is totally doable!!
- I always use a walking foot and wear my gardening gloves when quilting.
- I prefer to stitch with 50 wt cotton thread. Currently, I'm liking connecting threads silver colored thread.
- I quilt with a stitch length of about 2.5. I prefer a slightly tighter quilting stitch, though I know some people use up to a 3.5 length.
- I also quilt on a clean table that allows me to shift my quilt as needed without knocking things over and without catching on anything. You'll notice my quilt top is really spread out when I quilt so it has room to move with me as I go.
Here are some images of my quilting in progress!


So as you can see, I work with my quilt rather spread out across my table. Very little quilt is actually shoved in the throat of my machine at any given time. I also place a bowl on top of my machine (resting against the handle and not interrupting my thread tension) where I can drop my pins as I quilt. I prefer to have the pin bowl up high so I don't accidentally knock it over when I'm shifting my quilt. Remember, patience is key when quilting your own quilts!
For reference, this quilt is a larger throw size and measures 54" x 72". It took me approximately 30 minutes to mark, 45 minutes to baste, and 2.5 hours to quilt. I've done this pattern a couple of times, so that sped things up. The important thing is to take your time and take breaks as needed! I quilted about half of this before breaking for the night and finished it the next day. It's good for your mental health to take quilting breaks.

Here you can see a nice view of the completed quilting design before I trimmed my excess backing and batting. My peel shapes are NOT perfect, I promise! But from distance, nobody will notice and they'll look great and you'll have a super cute finished quilt ready for cuddles and play!
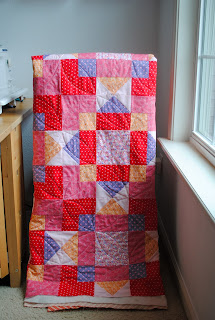
Finished Quilt
Here are some images of the finished product, bound, washed, and lookin' good.


Purchase the pattern!
Would you like to make your own gorgeous Large Lattice Quilt? The pattern is available for purchase as a PDF download on my website! The pattern comes with directions to make this quilt in 4 sizes (throw, twin, full/queen, king), plus directions for a pair of pillows. The quilt in this tutorial is the throw size. Each block is a whopping 18" square, so the quilt sews up really fast! You'll want to make this pattern again and again.
I'd love to see the beautiful quilts that you make! Thanks for stopping by. If you have questions about this tutorial, or want to share your quilts using this idea, please share below in the comments.
Happy Sewing!
- Erin

Comments
Post a Comment