
Scrappy Log Cabin Blocks
This might be my new favorite way to use scraps! I love how this scrappy log cabin style quilt came to be and it's such a quick and colorful way to use up odd bits of fabric.
I tackled this quilt in 2 main phases. First, I sorted and cut up my scraps into usable strips. Then I started sewing, building my blocks one strip at a time!
For this quilt, I made 25 blocks, each finished at 12" square which made for a 60" square quilt.


Sorting your strip scraps
When I end up with fabric scraps, I sort them into separate piles so they can be most usable for future projects. Anything that is a strip of fabric between 1"- 3" wide goes into a strips bin and is saved for a project like this one!
Before I started sewing, I organized my strip scraps in a way that will make sewing more efficient. I sort them into piles of similar lengths so I can have a range to choose from as I build my blocks. The smallest length pile are roughly strips 3" or less, then on average I make piles of strips that are 5", 7", 10", 13", 16" etc. long. For this quilt, I trimmed my blocks to 12.5" square, so I made them all about 13" so I had enough room to trim. You could continue to make your blocks bigger, or keep them smaller if desired!

As you build your blocks from the strips, your first couple of rows can be made with the smallest pile. Then the next few rows from the next pile size up, so on and so forth until you're done with the block! This helps keep you from digging through piles of fabric for your next piece and helps to randomize the fabric selection process.
I also used all scraps from all types of quilts (so long as they're all quilting cotton). This means including the occasional novelty print and holiday pattern. It all balances out in the end, I promise!
Sewing your blocks
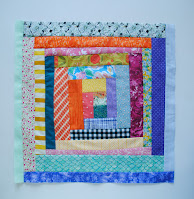
I started each of my blocks by sewing together two 2" squares. From there, the process of adding strips, pressing them out, and trimming any overhanging excess begins! I add the first strip onto the long side, fold/press it up and trim any overhanging fabric. Then repeat the process, rotating your block by 90 degrees each time you add another strip. Eventually it'll start to form the classic log cabin style block!
Because not all of the scrappy strips are the same width, it's likely that your blocks will start to become more of a rectangle and less of a square. I will often break my rotation to help balance out the block and add an extra strip on the sides that are a bit skimpy. If you prefer a more balanced log cabin block, you can make sure all your strips are the same width before starting.
Here's a youtube video I made on sewing the scrappy blocks!


Here are the individual blocks I made in the video tutorial. I ended up adding to these to create two 18" blocks that I'll turn into pillows.
Tips:
1- Chain piece your blocks. I chain all of my first row, then all of my second row, so on and so forth until the blocks are big enough.
2- Instead of ironing at each stage, just finger press your strips back so you can add the next row. Give a good press every few inches of building your blocks.
3- Keep scissors by your machine to snip strips that are overhanging. Not all of your seams need to be that perfect 1/4". So long as they're not too thin and not super fat to where it's adding bulk to your quilt, you'll be fine.
4- Don't plan your quilt! The point of the scrappy quilt is to roll with the punches. You might not like how the colors of a certain block are coming together, but when the whole quilt comes together, I promise it will look awesome.
5- Try not to use two of the same fabric in each block to really add to the scrappy mix of colors and patterns.


Trimming your blocks
Whatever size you'd like you finished blocks to be, you should aim to sew log cabin blocks larger by about 1". You'll inevitably get some lopsided blocks as you sew them, so having some extra room to trim them square will be very helpful. I then arrange my blocks in a basic grid layout and orient them as I please to balance out the colors!


The finished quilt!
I know I've said this before, but this might be my all time favorite quilt. It's so fun and cheerful and funky and just so happy! I love that the blocks are wonky and that they have scraps from so many previous projects, it's like a fabric scrapbook documenting all the other quilts I've made.


Quilting: I did a free motion quilting design on this quilt, making loop de loops across the quilt horizontally. The resulting texture is dreamy!


Binding: I also choose a scrappy binding for this quilt- it seemed fitting! I do keep my binding scraps separate from my other strip scraps, so they're already the right size and already pressed in half ready to go!


I hope you have fun making your own scrappy log cabin quilt! Remember to enjoy the process and not overthink it, that's what makes scrappy quilts so wonderful. If this feels daunting, start with a pillow to get the hang of it.
Now go forth and sew something beautiful!! I can't wait to see how your scrappy projects come together.
- Erin
Comments
Post a Comment